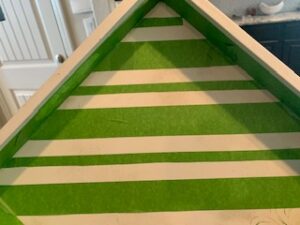
For This Easy Summer Serving Tray DIY:
I used 1.88″ frog tape, scissors, a 1″ foam brush and a small thin paint brush. I used this moody blue as it matches different spaces in my home. So, if I wanted to move it from the patio it would match my decor inside.
 I used two sizes of gaps to create my design. I did this by using the full width of the tape and then cutting the tape in half for skinnier sections, you see here. If you want to be precise, you can buy two different sizes of tape. I wasn't going for perfection. Place your full width center piece tape on the tray and work outwards. I placed my full width pieces apart about 2.75″ apart to each end. I went with a diagonal layout to my square tray. I think it added a designer touch.
Cut your skinny strips. Cut several pieces of the frog tape in half. I cut them a little longer than my tray. I wanted this to be an easy tray diy, so I just eyeballed mine. Typical around here. You can measure and mark with a pencil if that works better for you. I was going for a designer artisan look anyway. Then put them in between the full pieces.
Double check your layout. Set the tray on your table and step back to get a quick look from a far and if it looks good move on to the next step. If not, readjust it.
First, paint the foam brush strokes. If you want to test it first, you can always use a piece of scrap wood or paper and do that before applying it to your tray. Less paint is best to start out, so happy painting! Make sure to leave enough space in between the foam brush dabs for the next step. Which is to apply the skinny brush strokes. Here is a quick diy tray video for a visual.
Peel your tape off once you are finished painting using both brush sets. Make sure you do this before your paint dries so it doesn't come off with the tape.
Last apply a topcoat to your tray diy so it lasts longer. Topcoats are important to protect your design from chipping or wearing over time. You don't always need one, but I highly recommend one in most instances. I used this one since my tray will be on my back porch and we use it often. So, use one according to how you will use your tray.

