
Trendy Pole Wrap DIY from Home Depot
This table riser DIY project is for an intermediate level due to the bevel cuts on the table saw. The table saw. The table saw is a power tool I recommend using later in your DIY journey. It definitely becomes easier with practice though.
-
1″ plywood
-
pole-wrap
-
table saw
-
miter saw
-
painter's tape
-
wood glue
Next, cut your pole wrap sides. First, decide how you want to wrap your plywood base. I cut my pole-wrap into 2″ strips. I wanted table riser to have a seamless look, where the grooves continued on the top and sides. So, I went with a bevel cut for all of the sides and top. I used my table saw at a 45-degree angle and cut one long strip into 2″ x ~60″ which left me a few inches in length for error. Another way to do it would be to use butt joints. I used my miter saw and box cutter to cut the pole wrap as needed.
Now, for the easy part, glue your sides together. I used wood glue and clamps for this step. You can add some pin/brad nails with your nail gun if you want, but wood glue is strong enough. When using only wood glue in diy projects, make sure you use enough and clamp firmly and let it dry completely. It's been over a year, my pole wrap diy is still solid and intact.
Lastly, cut your pole wrap top piece. I measured my top and cut my piece an inch wider on all sides to leave enough room to cut it 45 degrees all the way around and nestles up to the sides beautifully. I tested it against the base and the sides and cut my 45 angles until it fit.
Last minute, I decided to add a bottom trim detail at the bottom of the pole wrap. I felt like something was missing and it gave the table riser a completed look. I used 1/4″ thick scrap wood at half an in wide and mitered the edges to fit.
How to cut pole wrap YouTube here.
Pole Wrap DIY Home Decor Ideas
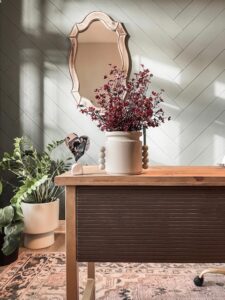
Desk Makeover: Give an old desk a fresh look without breaking the bank. I wanted a new desk, but mine was in good condition. So, I decided to glue and nail pole wrap all around the sides and drawers. I painted it a pretty brown and spraypainted the legs an antique gold. I love how it came out and it was easy. Here's the video.
Wrap a Dresser or Cabinet: This is probably the most popular pole wrap DIY. I see a lot of wrapped dressers and cabinets. Pole wrap is flexible and can be easily cut to size to fit around a drawer or cabinet. I cut pole wrap for my desk drawers here and it was very easy. Precisely measure the width and height of the front of the drawer and cut a piece of pole wrap to match those dimensions. Remember to test your drawers so that they open and close easily. Then use wood glue and pin nails to attach the pole wrap to the drawer or cabinet front. You can even add decorative trim around the edges of the pole wrap to give it a polished look.
Create Faux Beams: Pole wrap DIY beams sounds like a modern dream to me. This would be a great way to add visual interest to a room. You obviously need beams first and there are easy DIY faux beam how-tos out there. Once you have your beams up, just cut the lengths of pole wrap to match. Then, use an adhesive and brad nail gun to attach the pole wrap to the beams, creating the look of support beams. You can even paint the pole wrap to match the rest of the room for a cohesive look.
Design a Headboard: Pole wrap can also be used to create a unique headboard for your bed. You could DIY the headboard first or thrift one. If you want to create a faux headboard, just measure the width of your bed and cut a piece of pole wrap to match. You can even design it further out and add some cute nightstand underneath. Then, use glue and possibly pin nails to attach the pole wrap to the wall behind your bed. You can even add decorative trim or paint the pole wrap to match your bedding for a cohesive look.
Decorate a Room Divider: Room dividers aren't as popular as they once were, but if you have one in your home you could give it a modern makeover. Measure the dimensions of each panel of the divider and cut a piece of pole wrap to match. Use adhesive to attach the pole wrap to the panel and get a modern, eye-catching design.
Cover a Lampshade: This pole wrap diy is on my list to do. It can be used to cover a lampshade. Cut a piece of pole wrap to match the height and width of the lampshade and just glue it on to attach the pole wrap to the shade. Lining the pole wrap up just right might be a tad tricky, so measure and test first. You can add decorative trim or paint the pole wrap to match your decor.
Pole wrap is a versatile material that can be used in a variety of DIY projects to enhance the look of your home. From faux beams to unique headboards, pole wrap can be used in many creative ways to add character and interest to your living space. Consider trying out one of these five ideas in your own home, and let your creativity flow with this simple and affordable material.
Quick Tips for Cutting Pole Wrap
Measure precisely – The first rule in every pole wrap diy, get the measurements right because it isn't cheap if you mismeasure. Take a measuring tape and wrap it around the column to determine its circumference.
Use the right tools – When cutting the pole wrap vertically, you can use a box cutter or hand saw in between the grooves. To get a clean without causing it to fray or tear, you can cut your pole wrap with either a handsaw, a miter saw, or jigsaw. Ensure that the blade is sharp and in good condition before making any cuts. Watch those fingers, I sliced mine twice with the box cutter knife on my pole wrapped desk project. It hurt so bad!
Make the cuts – To make clean cuts, use the blue tape trick with the power tools. Use a sawing motion and avoid pushing too hard on the material for your vertical cuts. Start from the top of the pole wrap and work your way downwards. If using a handsaw, clamp the pole wrap securely to a workbench or table before making the cuts.
As always, don't forget your safety gear when using power tools.
Sand the edges – After making the cuts, the edges of the pole wrap may be rough and uneven. Use a fine grit sandpaper to smooth out the edges and remove any splinters or sharp edges. Be sure to wipe away any dust with your tact cloth or a lightly damp cloth.
Apply the pole wrap – Once the pole wrap is sanded, you can apply it to your DIY project. It is recommended to use construction adhesive and or nails depending on your pole wrap diy project. I used only glue on my table riser and I used glue and nails on my desk makeover. If you are only using glue, try to use clamps or hold the pole wrap in place for a few minutes. Use a roller or squeegee to remove any air bubbles and ensure that the pole wrap is firmly in place.
Power Tools For Cutting Pole Wrap
A saw is a power tool that can be used to cut pole wrap. It is important to use a saw with a blade that is designed for cutting through plastic, such as a carbide-tipped blade.
A jigsaw can be used to cut pole wrap by following the same process as described for using a drill. First, make a hole in the wrap with a drill bit. Then, insert the jigsaw blade into the hole and use the tool to guide the blade through the wrap.
A table saw is a power tool that is used to make precise, straight cuts in wood. It consists of a table with a blade in the middle, and push the pole wrap through the blade to make the cut. Since the pole wrap is flexible be care when cutting it.
A circular saw can also be used to cut pole wrap. First, make a mark on the wrap where you want to make the cut. Then, set the depth of the blade on the saw so that it will only cut through the top layer of the wrap. Finally, align the blade with the mark and make the cut.
A utility knife can be used to cut pole wrap by following the same process as described for using a circular saw. First, make a mark on the wrap where you want to make the cut. Then, carefully run the utility knife along the line until you have cut through the entire thickness of the wrap
Cutting pole wrap may seem daunting at first, but with the right tools and techniques, you can achieve a professional-looking finish that will enhance the beauty of your home or diy project. Remember to measure precisely, use the right tools, and sand the edges to ensure a clean cut. With these tips in mind, you can confidently tackle any pole wrap DIY that comes your way.

 I love cute and functional. I may have taken this wood bead vase DIY a step too far with the pen holding section – but it was fun and I couldn't help myself! I found this coffee canister at the thrift store and I liked the lip detail at the top. I thought it would be cute with flowers in it. So, I decided to flip it into a vase for my office. If you have been here a bit, you already know my love for vases and all the vase DIY's I have done. What's one more!!?
 Follow these steps if you are drilling a hole in the wood beads for a pen.
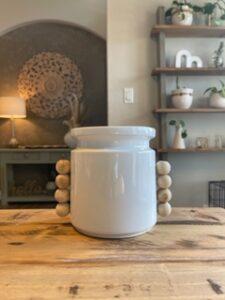 Time to paint your vase diy.
 I used two sizes of gaps to create my design. I did this by using the full width of the tape and then cutting the tape in half for skinnier sections, you see here. If you want to be precise, you can buy two different sizes of tape. I wasn't going for perfection.