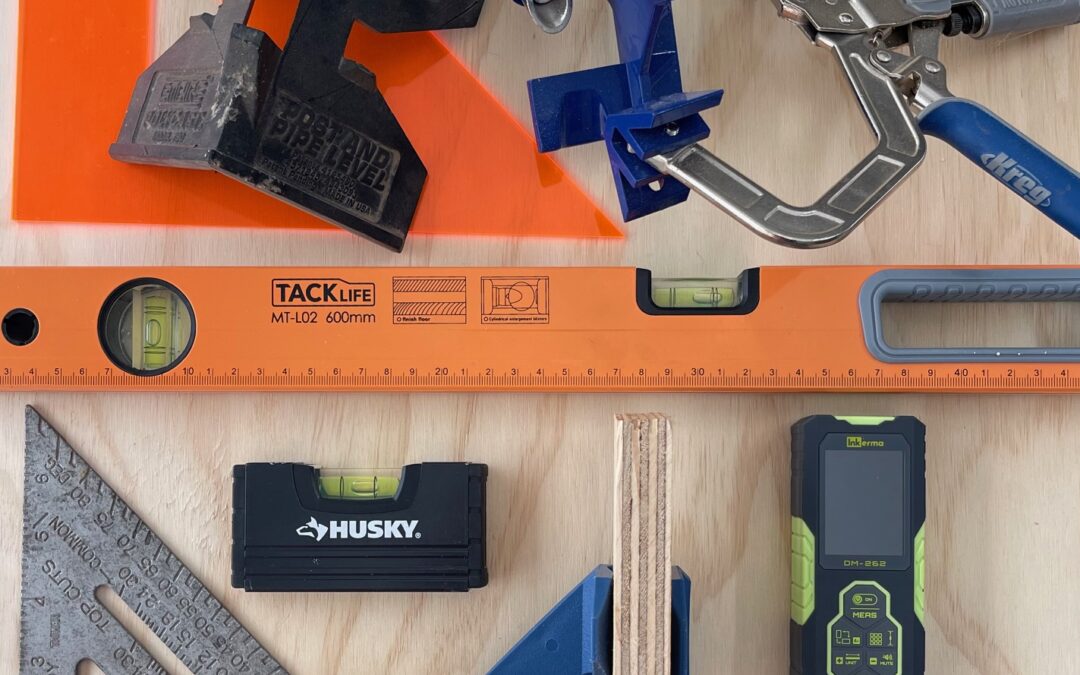
Two hand tools as a Woodworking beginning & for DIY home projects you will need is a speed square and a bubble level.
You know the saying “don't be a square” – aka not cool or just not nice? It's quite the opposite when it comes to Wood Working and DIY. You actually want to be square – well you want your DIY & Woodworking projects to square.
Projects being square is one of the most important lesson (besides safety) that I've learned when it comes to building furniture, woodworking and DIY home projects.
Always ensure your projects are level, plumb & square from the very beginning. In this blog post I'll talk about those terms mean, the different types of squares and levels and what they are used for.
I'll also go over step by step instructions on how to use them. And provide tips for getting your wood working and DIY projects aligned from the beginning to eliminate mistakes. Let's start with what being square means.
The Terms & Definitions for Woodworking & DIY Beginners:
Level: When an object or surface is level, it means it is perfectly horizontal or parallel to the earth's surface, like a ball sitting on top won't roll, ha! In woodworking, ensuring surfaces like shelves, tabletops, or countertops are level is essential for functionality and aesthetics. A level surface ensures that objects placed on it will not tilt or roll and provides a visually pleasing result.
Plumb: Plumb refers to an object or surface that is perfectly vertical or perpendicular to the earth's surface. In woodworking, ensuring that structures like walls, posts, or cabinets are plumb is crucial for stability and structural integrity. This ensures that the weight is distributed evenly and prevents leaning or tilting, especially in load-bearing elements.
Square: Squareness in woodworking refers to the angle formed between two intersecting surfaces, typically 90 degrees. Ensuring that corners, joints, and edges are square is essential for proper fitting, alignment, and stability of the overall structure. This ensures that pieces fit together accurately and results in a professional-looking finish.
In summary and an easy way to remember: horizontal (level) or vertical (plumb) level, plumb, and square are fundamental concepts in woodworking and DIY projects that basically means the surfaces are flat, vertical, and properly aligned.
First, let's dive into why this step is SO crucial for success.
(As an Amazon Associate I earn from qualifying purchases at not additional cost on your end)
Reasons Why Getting DIY Projects Square is Key:
Stability: Square and plumb structures are more stable, ensuring longevity and safety.
Functionality: Properly squared furniture pieces fit together seamlessly, enhancing usability.
Ease of Assembly: Square components make assembly straightforward and reduce frustration and ensures pieces are more compatible and easier to integrate with other furniture or structures.
Precise Measurements: Ensuring squareness helps maintain accurate measurements throughout the project and can help you catch mistakes during wood working & DIY projects
Alignment: Square components align correctly, preventing misalignment issues down the line.
Mitigating Warping: Square projects also helps minimize the risk of warping or twisting over time.
Aesthetics & Professional Finish: Squareness lays the foundation for flawless finishes, adding to the overall appeal. Square edges and corners result in a polished, professional appearance for your projects.
Achieving squareness from the very beginning is key to a successful project completion.
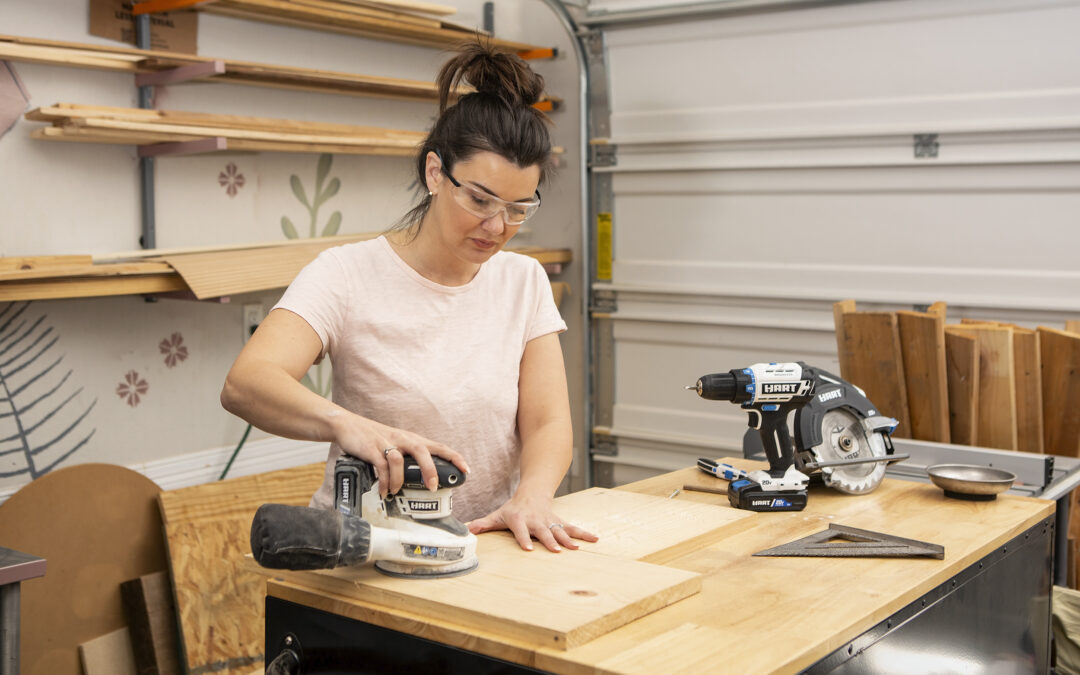
Furniture Building Tips Using a Level & Square
When it comes to furniture building, making sure your pieces of wood are square and level is crucial for a sturdy and visually appealing final product.
One tip is to always double-check your measurements and use a reliable square tool to ensure precise angles. Additionally, when attaching legs to a table or any other structure, make sure they are perfectly square unless the design calls for a specific angle. You don't want your table to wobble! Trust me, I've had to fix this once and it wasn't fun having to redo the work I just completed.
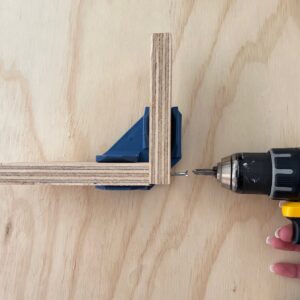
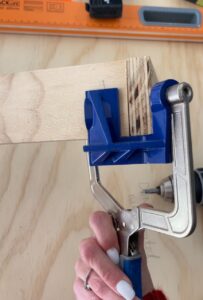
Utilizing clamps during assembly can also help keep pieces aligned while glue dries and maintain squareness throughout the build. They make different types of corner clamps and framing square jigs that you can buy to help assist while getting your corners squared up.
If something isn't perfectly square, make adjustments before the glue sets. Often, simply readjusting the position of a board, loosening a screw or clamping the boards can square them up.
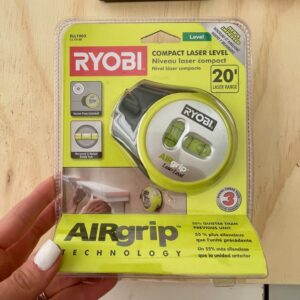
Investing in quality leveling tools, such as a bubble level or a laser level, can greatly assist in ensuring all components are perfectly level, resulting in a professional finish. By following these tips and utilizing the right tools, you can create furniture pieces that are not only visually appealing but also built to last.
Accent Wall Tips Using a Level & Square
Creating a stunning accent wall begins with ensuring it's square and level from the get-go. Of course there are plenty of designs like the herringbone wall and geometric designs where your guidelines might look a little different.
But for accent walls like board and batten and shiplap, start by marking level lines on the wall using a carpenter's level or laser level. These lines serve as a guide for the placement of your wood trim or shiplap. When installing the trim or shiplap, it's essential to use a stud finder to locate and mark the studs in the wall.
Heavier woods should be anchored into studs, but there is a “criss cross” method or hack using the brad nail gun for drywall attachment only.
This ensures your pieces have a solid anchor for support. Additionally, using the ceiling and floor as reference points can help maintain straightness and centering. However, always double-check with your level to ensure accuracy. When installing each piece, use finishing nails or a brad nailer to secure them in place, ensuring they're flush with the level lines for a seamless finish. By following these tips and utilizing the proper tools, you can achieve a perfectly square and level accent wall that adds depth and character to your space
Before making your cuts, it's recommended to trim approximately 1/4-1/2” off your board. Typically, the ends of boards purchased from stores aren't perfectly square. Trimming off a bit ensures they're squared up for accurate cuts.
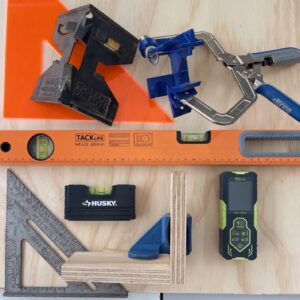
Here are a few different types of squares:
Speed Square: A versatile tool used for marking angles and making square cuts, particularly in carpentry and roofing. It features a triangular shape with various markings for different angle measurements. The speed square what I use the most in my woodworking and DIY projects. It's affordable and efficient.
(this is the one I bought) amazon affiliate link
Framing Square: Also known as a carpenter's square, it's primarily used in framing carpentry for laying out and cutting rafters, stairs, and framing joints. It consists of two arms, one long and one short, typically at a 90-degree angle. I have one my dad gave me and I've used it a few times during bigger DIY home projects
Miter Square: Specifically designed for marking and cutting precise miter joints at various angles, commonly used in woodworking for trim and molding work.
Combination Square: This tool combines a ruler and square head, allowing for precise measurements and marking of 90-degree and 45-degree angles. It's commonly used in woodworking and metalworking.
Try Square: A simple square with a stock and blade at a 90-degree angle, used for checking and marking right angles in woodworking and carpentry.
Adjustable Square: Similar to a try square but with an adjustable blade, allowing for flexibility in marking and checking angles other than 90 degrees.
Engineer's Square: A precision square with a hardened steel blade and stock, used for checking the accuracy of machinery and metalworking projects
Rafter Square: Similar to a framing square but with additional markings and measurements specifically for laying out rafters and roof pitches, commonly used in carpentry and roofing.
Tips for How to Use a Square:
Align one corner of the speed square with a corner of your project and verify if both sides align with the square throughout. Just as you always double-check your measurements, check your corners through out your project especially as your in progress. Depending on what project you are working on, the angles and squareness can get shifted as you build.
Another way to double check, is to use a tape measure to measure from one opposite corner to another, repeating the process for all corners. Consistent measurements indicate a square project.
Each type of hand tool square serves specific purposes in various trades and projects, ensuring accuracy and efficiency in layout and construction tasks. I suggest starting with the most common speed square for beginner wood working and DIY projects.
Here are a few different types of levels:
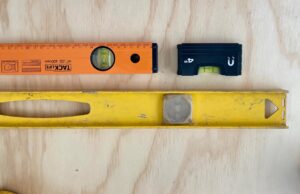
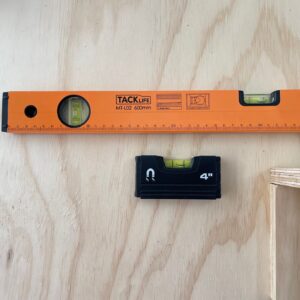
Bubble Level: Also known as a spirit level, it's a basic level with a bubble vial filled with liquid and an air bubble. It's used for determining if a surface is horizontally or vertically level by centering the bubble between two reference lines.
Torpedo Level: A smaller, compact level with a torpedo-shaped body, often with magnetic edges for attaching to metal surfaces. It's useful for tight spaces, such as plumbing work, and for checking horizontal and vertical alignment.
Box Level: Featuring a rectangular body with multiple vials for checking horizontal, vertical, and sometimes diagonal levels simultaneously. It's commonly used in carpentry, construction, and general household tasks for ensuring accuracy in larger projects.
Digital Level: Utilizes electronic sensors to provide precise digital readings of angles and levels. It often includes features such as a backlight display and audible signals for accuracy. It's beneficial for highly accurate measurements in professional settings like engineering and surveying.
Line Level: A small, lightweight level with hooks or notches for attaching to a string or line. It's primarily used in construction and landscaping for ensuring straight and level lines over long distances, such as when installing fences or decks.
Laser Level: Projects a visible laser beam onto surfaces to provide precise horizontal, vertical, or angular reference lines. It's ideal for large-scale construction projects, such as setting foundations or installing tiles, where accuracy over long distances is critical.
Each type of level serves specific purposes in different trades and projects, ensuring precise alignment and accuracy in various applications.
Tips for How to Use a Level
I can't think of a project I haven't used a level and some type of square on, minus crafting and DIY home decor. Here's a quick instruction guide for using a bubble level.
Begin by placing the level on the surface you want to check. Adjust the position until the bubble in the tube is centered between the lines.
For horizontal leveling, move the level along the surface until the bubble is centered. Try your best to get the bubble in the very center, and just use your best judgement and don't be overwhelmed with perfection. The two lines are there as a guide, so your best guess between those will do.
To check vertical surfaces, align the level vertically and adjust until the bubble is centered. Again use your best judgement to get it as centered as possible.
When using a bubble level, make sure it's in good condition and free from dirt or damage that could affect its accuracy. I have one that my dad gave me that started not to work.
Additionally, always check the level against multiple points to ensure consistency and accuracy throughout your project
How to Use a Laser Level
Generic steps on how to use a laser level to ensure accurate and precise measurements:
Setup: Start by placing the Inkerma laser level (the one I own) or any level of choice on a stable surface or mounting it securely to a tripod. Ensure that the level is positioned at the desired height and location for your project.
Power On: Turn on the laser level by pressing the power button or switch. Some models may require you to hold the button for a few seconds to activate.
Select Unit and Mode: Depending on your project requirements, select the appropriate unit measurement (I use inches) and the mode on the laser level. Common modes include horizontal, vertical, cross-line, or rotary modes. Adjust the settings according to your specific needs.
Adjustment: Use the built-in adjustment knobs or buttons to fine-tune the laser level's position and alignment. Ensure that the laser lines are perfectly level or plumb according to your project's requirements.
Placement: Position the laser level at the starting point of your project. Ensure that it is stable and securely placed to prevent any movement during operation.
Alignment: Once the laser level is positioned correctly, activate the laser beam(s). Check the alignment of the laser lines against your reference points, such as walls, floors, or other surfaces. Make any necessary adjustments to ensure accurate alignment.
Marking: Use a pencil or marker to mark the projected laser lines on the surfaces you are working on. These marks will serve as guides for your construction or installation tasks.
Operation: Proceed with your construction or installation tasks, following the marked laser lines as guides for precise alignment and positioning.
Monitoring: Throughout your project, periodically check the alignment of the laser lines to ensure that they remain accurate and consistent. Make any adjustments as needed to maintain alignment and precision.
Power Off: Once you have completed your project or no longer require the laser level, turn it off to conserve battery power. Store the laser level in a safe and dry place for future use.
Some common modes and options found in laser levels include:
Horizontal Mode: Projects a horizontal laser line across a surface, typically used for aligning objects or installing fixtures such as shelves or cabinets.
Vertical Mode: Projects a vertical laser line, useful for tasks like aligning tiles, installing wall-mounted objects, or ensuring upright positioning of structures.
Cross-Line Mode: Simultaneously projects horizontal and vertical lines, creating a crosshair pattern. This mode is beneficial for tasks requiring both horizontal and vertical alignment, such as installing drop ceilings or partition walls.
Manual Mode: Allows manual adjustment of the laser beam's direction and angle, useful for custom alignments or non-standard applications.
Rotary Mode: Projects a rotating laser beam in a 360-degree horizontal or vertical plane. Rotary laser levels are ideal for large-scale projects such as outdoor grading, landscaping, or laying foundations.
Pulse Mode: Enables the laser level to emit pulses of light instead of continuous lines, enhancing visibility in bright light conditions or over longer distances. Pulse mode is often used with a receiver for outdoor applications or when working in challenging environments.
Self-Leveling Mode: Automatically levels the laser beam within a specified range, compensating for minor surface irregularities or vibrations. This mode ensures accuracy and consistency in leveling and alignment tasks.
Manual Leveling: Some laser levels offer manual leveling capabilities, allowing users to adjust the level manually using built-in controls or adjustment knobs. Manual leveling may be preferred for specific applications or when working on surfaces that are difficult to level automatically.
Dual Slope Mode: Found in advanced rotary laser levels, dual slope mode enables the laser beam to project at two different slopes simultaneously, useful for tasks like grading or laying drainage systems.
Remote Control: Some laser levels come with remote control capabilities, allowing users to operate the level and adjust settings remotely, enhancing convenience and efficiency, especially when working alone or in hard-to-reach areas.
These modes and options provide users with flexibility and versatility in laser level operation, catering to a wide range of construction, woodworking, and DIY projects.
I hope you learned a bit more about how important it is to get your woodworking and DIY projects level and square from the very beginning. It's a crucial aspects of ensuring accuracy and precision in constructing projects and furniture assembly.
If you have any additional questions or tips I should add leave a comment or find me over on Instagram.
Here are the top 20 ways & tips to learn DIY Skills
With the emergence of various online platforms, DIY has become more popular. Who doesn't love to watch a good DIY before and after?
People are now empowered to be more creative and resourceful in pursuing their DIY skills. Learning new or improved DIY skills is not only fun, but also practical. You can save money, create something unique, and have a sense of satisfaction seeing your labor of love. You will remember the day you look at your first DIY project and say, “I made that!”
If you're interested in learning how to DIY skills, below are 20 tips to help you head in the right direction.
Learn About Beginner DIY Tools
Learn what power tools are best for beginners. Each power tool is very learnable, but if you err on the side of caution and have anxiety, using tools that are rated as beginner tools will help you ease into it a bit more safer.
Before starting any project, you want to have the right tools. There are many different approaches to DIY home projects and some tools can be used for tasks they weren't intended for. This goes against safety standards though and it's not recommended especially for a beginner. Try to stick to using each tool for how it was made to be used.
It's important to do some research on the tools you will need as a beginner, and to complete specific projects. Here are a few tools I've rated as beginner friendly – a miter saw or possibly a jigsaw for smaller DIY projects, a power drill, an orbital sander and brad nail gun. Also, it's important to know that with almost every DIY project, you are going to use a speed square and level.
There are other essential tools that you should have in your toolbox, and I talk more about that in my free diy for beginner's basics kick-starter guide.
Watch Videos
There are numerous DIY videos available on different platforms. (YouTube, Instagram, Tiktok, Facebook) Find a few favorite DIY content creators you trust and would love to learn DIY skills from. Watching these videos will give you ideas and tips for starting DIY projects.
Unfortunately, some DIY steps can get left out of videos. So, you might have to watch a few different DIY project videos to get clear and detailed instructions on how to complete a task from start to finish.
Tackle the Basics
Starting with the DIY beginner basics allows you to gradually enhance your skills and confidence in DIY projects. Simple DIY projects such as painting your room, hanging curtains, building simple planters, adding shelves to a closet, convert a closet into a mudroom, simple accent walls in a kid's room are good examples of basic projects that you could learn DIY skills from.
I always suggest starting in a spare room, closet, kids room in case it isn't perfect the first time.
Finish Your Projects
It's soooo important that you complete your DIY projects. Make sure that you have enough time, focus, and resources to complete a project. Talk to your family about the timeline and helping with kids if needed. Schedule time in your calendar, and make sure you are well prepared. The sense of satisfaction you get from completing a project will give you the confidence to move forward with others.
Not to mention, you don't want to end up on the 95% club, because it starts to wreak havoc in your house and will eventually stress you out. Don't ask me how I know!!?!
Start Small DIY Projects
I talked about some projects in the basics section, but I really wanted to emphasis SMALL. Starting on a smaller scale project than what you might normally do is great for DIY beginners. When you learn a new skill or hobby, it's essential to feel successful and encouraged. Some even small projects could be home decor upcycles, furniture flips, building a picture frame, or paint a color block accent wall.
Plan Plan Plan – Skills & Projects
Planning is crucial when it comes to learning DIY skills and doing projects. Before starting, take time to plan the project from start to finish. Identify the materials and tools you need; estimate the time the project will take and factor in any possible challenges. Sometimes this comes with experience, and you will get better with each project.
I will admit, I often start projects without a out plan. That works for me on occasion, so do what is best for you. If you are waiting because you don't have the perfectly thought out plan – then don't let that hold you back and just START somewhere.
Know What DIY PPE You Need
Safety is a top priority when learning DIY skills and doing any DIY project. Make sure to wear protective gear such as safety glasses, ear protection, masks and possibly gloves to protect yourself from harm. At first it seems trivial, but it's so important to prevent any injuries. Over time saw dust and loud noises will have an adverse effect on your body. Remember, prevention is better than cure.
Learn How to Measure Properly
Measuring correctly is essential and top on my list teaching my DIY beginner students. Accurate measurements ensure that your work is precise and of high quality. It prevents you from wasting time and money having to start over. Invest in a good tape measure, square and angle gauge.
Learn How to Cut Accurately
Cutting accurately is also essential when working with wood, metal, or any material. Know what tools are best for what cuts and types of material (sometimes types of wood as well). Practice your cutting skills and techniques before starting your project.
Prepping the Material
Prepping your wood correctly is essential in any DIY project. Make sure to clean your materials, sand them down using the correct grit sequence, and remove any splinters or rough edges if needed. This will ensure that your work is neat and professional-looking. It's also essential for staining and painting.
Take a Class or Course
Taking a class or course is a great way to learn about DIY skills. There are numerous online and offline courses that you could take. Some community centers or home improvement stores even offer free classes and workshops on DIY projects. Find one that best fits your timeline and budget. Sometimes investing in yourself saves you time and money down the road. It equips you with the right knowledge and skills and can even boost your confidence and have a positive impact in helping you reach your goals quicker. Check out my DIY Kick Starter Course here.
Identify Your Interests
DIY projects are a broad category, and it's a good idea to identify what you like doing so you know the right DIY skills to learn. If you enjoy painting and decorating, focus on DIY projects related to interior design and home decor. You may not need as many tools going this route. It's also a great place to start to help you build up to more advanced DIY projects. If you want to build furniture or do cabinets or trim work, try focusing on DIY skills and projects that are more in line with woodworking and cabinetry.
Talk to Others You Know that DIY
Talking to people who are already doing ideas or who have already completed a DIY project can provide a wealth of knowledge. Ask for tips and techniques, learn from their mistakes. Learning a new skill is fun with friends anyway. You might even find a supportive community of DIYers who can encourage and inspire you.
Use High-Quality Materials
I agree this one is a little circumstantial to your situation and honestly the project. As a beginner, I don't recommend the investment until you have had a few projects under your belt. If the means are there, using high-quality materials on your DIY projects will make them more durable and long-lasting. Investing in quality materials may be more expensive, but sometimes it's worth the investment in the long run. Something to think about as you hone in on your skills and level up your DIY projects.
Practice Patience
Patience is essential in learning diy skills or any new skills. Some projects may take longer than expected, and it's important to be patient and focused throughout the process. Sometimes you have to work on projects in between life and kids. It can be frustrating because you are excited for the new project to be completed and see that pretty space done. Rushing through a project may lead to poor quality work, you skipping important steps or even injury.
Get Creative (my favorite)
DIY projects are all about creativity and originality. I mean sometimes it's an exact dupe, ha! But, don't be afraid to experiment and come up with new ideas. I love trying to reuse things from around the house and making treasures from trash! Combine techniques and materials that may seem unconventional but work well together. Trust me, I have thrown out plenty of projects or home decor pieces that came out blotched from experimentation. Just have fun with it, and if you have friends or kids, get them involved.
Explore New Horizons
Challenge yourself by trying new DIY projects here and there, even if they are outside of your comfort zone. This will help you develop new skills, and who knows, you might find something else you really love to do!
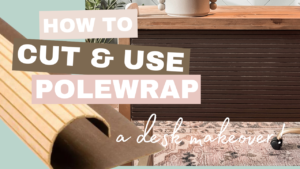
When pole wrap from Home Depot is in stock, run!! This fun material is quickly becoming one of the hottest trends in design and home decor. You can't scroll Instagram without coming across an awesome pole wrap DIY, but it isn't cheap. If it's within your budget go for it. It adds an eye-catching element that brings a modern feel to your project.
In this blog post, I'll discuss tips on cutting pole wrap, how I built my super cute table riser and some ideas for some pole wrap DIY home decor. Let's just hope Home Depot brings it back in stock. I find it occasionally at Ace, Lowes or Amazon.
My love for a good pole wrap DIY continues, and this table riser turned out super cute. My first experience using it was when I made over my desk. I couldn't resist all those pretty grooves as part of my center piece decor. This was a really fun pole wrap DIY with the bevel cuts allowing the grooves to line up seamlessly. The finished product now graces my kitchen table and is the perfect detail.
Pole Wrap DIY Table Riser
This table riser DIY project is for an intermediate level due to the bevel cuts on the table saw. The table saw. The table saw is a power tool I recommend using later in your DIY journey. It definitely becomes easier with practice though.
This DIY project developed due to an interior design dilemma. In summary, I bought a blue vase to add some color to my dining area. I have a big white farmhouse table and brown chairs (that eventually need some love). But I bought the vase because I loved it and hoped it was big enough for my kitchen table, but unfortunately it was not. The proportion was off just a little. It was too small in comparison to my table. As a result, I needed something under it to balance it out, like a tray or table riser.
First, cut your base. I used 1″ plywood for my table riser. The pole wrap is thin but will add about a ~1/6 of an inch thickness on all sides after it's added. I wanted mine to be rectangular, so it sits nicely on my rectangle dining table. I used my miter saw to cut 11″ by 14″ base. You could even buy cheap project panels on Amazon like these if you didn't want to cut the base.
Next, cut your pole wrap sides. First, decide how you want to wrap your plywood base. I cut my pole-wrap into 2″ strips. I wanted table riser to have a seamless look, where the grooves continued on the top and sides. So, I went with a bevel cut for all of the sides and top. I used my table saw at a 45-degree angle and cut one long strip into 2″ x ~60″ which left me a few inches in length for error. Another way to do it would be to use butt joints. I used my miter saw and box cutter to cut the pole wrap as needed.
Now, for the easy part, glue your sides together. I used wood glue and clamps for this step. You can add some pin/brad nails with your nail gun if you want, but wood glue is strong enough. When using only wood glue in diy projects, make sure you use enough and clamp firmly and let it dry completely. It's been over a year, my pole wrap diy is still solid and intact.
Take note, the pole wrap grooves on the top will only line up with two sides as seen below.
Lastly, cut your pole wrap top piece. I measured my top and cut my piece an inch wider on all sides to leave enough room to cut it 45 degrees all the way around and nestles up to the sides beautifully. I tested it against the base and the sides and cut my 45 angles until it fit.
Last minute, I decided to add a bottom trim detail at the bottom of the pole wrap. I felt like something was missing and it gave the table riser a completed look. I used 1/4″ thick scrap wood at half an in wide and mitered the edges to fit.
One added tip during this pole wrap DIY is to continue to fit check everything as you go. Especially when gluing this together to make sure it lines up. This is one of my favorite home decor pieces I made, and pole wrap is all the rav lately and I'm loving it too. Nevertheless, my vase looks beautiful on the table riser, and it looks much better on my kitchen table. I added some monstera cuttings for height and love it!
Pole wrap is a versatile material that can be used in a variety of ways to enhance the look of your home. It is most commonly used in basement finishing projects to cover up unsightly support poles, but it can also be used in other ways to add decorative flair to your living space. This post will explore some of the different ways that pole wrap can be used in your home to create unique and interesting DIY projects.
Pole Wrap DIY Home Decor Ideas
Desk Makeover: Give an old desk a fresh look without breaking the bank. I wanted a new desk, but mine was in good condition. So, I decided to glue and nail pole wrap all around the sides and drawers. I painted it a pretty brown and spraypainted the legs an antique gold. I love how it came out and it was easy. Here's the video.
Wrap a Dresser or Cabinet: This is probably the most popular pole wrap DIY. I see a lot of wrapped dressers and cabinets. Pole wrap is flexible and can be easily cut to size to fit around a drawer or cabinet. I cut pole wrap for my desk drawers here and it was very easy. Precisely measure the width and height of the front of the drawer and cut a piece of pole wrap to match those dimensions. Remember to test your drawers so that they open and close easily. Then use wood glue and pin nails to attach the pole wrap to the drawer or cabinet front. You can even add decorative trim around the edges of the pole wrap to give it a polished look.
Create Faux Beams: Pole wrap DIY beams sounds like a modern dream to me. This would be a great way to add visual interest to a room. You obviously need beams first and there are easy DIY faux beam how-tos out there. Once you have your beams up, just cut the lengths of pole wrap to match. Then, use an adhesive and brad nail gun to attach the pole wrap to the beams, creating the look of support beams. You can even paint the pole wrap to match the rest of the room for a cohesive look.
Design a Headboard: Pole wrap can also be used to create a unique headboard for your bed. You could DIY the headboard first or thrift one. If you want to create a faux headboard, just measure the width of your bed and cut a piece of pole wrap to match. You can even design it further out and add some cute nightstand underneath. Then, use glue and possibly pin nails to attach the pole wrap to the wall behind your bed. You can even add decorative trim or paint the pole wrap to match your bedding for a cohesive look.
Decorate a Room Divider: Room dividers aren't as popular as they once were, but if you have one in your home you could give it a modern makeover. Measure the dimensions of each panel of the divider and cut a piece of pole wrap to match. Use adhesive to attach the pole wrap to the panel and get a modern, eye-catching design.
Cover a Lampshade: This pole wrap diy is on my list to do. It can be used to cover a lampshade. Cut a piece of pole wrap to match the height and width of the lampshade and just glue it on to attach the pole wrap to the shade. Lining the pole wrap up just right might be a tad tricky, so measure and test first. You can add decorative trim or paint the pole wrap to match your decor.
Pole wrap is a versatile material that can be used in a variety of DIY projects to enhance the look of your home. From faux beams to unique headboards, pole wrap can be used in many creative ways to add character and interest to your living space. Consider trying out one of these five ideas in your own home, and let your creativity flow with this simple and affordable material.
Quick Tips for Cutting Pole Wrap
Measure precisely – The first rule in every pole wrap diy, get the measurements right because it isn't cheap if you mismeasure. Take a measuring tape and wrap it around the column to determine its circumference.
Use the right tools – When cutting the pole wrap vertically, you can use a box cutter or hand saw in between the grooves. To get a clean without causing it to fray or tear, you can cut your pole wrap with either a handsaw, a miter saw, or jigsaw. Ensure that the blade is sharp and in good condition before making any cuts. Watch those fingers, I sliced mine twice with the box cutter knife on my pole wrapped desk project. It hurt so bad!
Make the cuts – To make clean cuts, use the blue tape trick with the power tools. Use a sawing motion and avoid pushing too hard on the material for your vertical cuts. Start from the top of the pole wrap and work your way downwards. If using a handsaw, clamp the pole wrap securely to a workbench or table before making the cuts.
As always, don't forget your safety gear when using power tools.
Sand the edges – After making the cuts, the edges of the pole wrap may be rough and uneven. Use a fine grit sandpaper to smooth out the edges and remove any splinters or sharp edges. Be sure to wipe away any dust with your tact cloth or a lightly damp cloth.
Apply the pole wrap – Once the pole wrap is sanded, you can apply it to your DIY project. It is recommended to use construction adhesive and or nails depending on your pole wrap diy project. I used only glue on my table riser and I used glue and nails on my desk makeover. If you are only using glue, try to use clamps or hold the pole wrap in place for a few minutes. Use a roller or squeegee to remove any air bubbles and ensure that the pole wrap is firmly in place.
Power Tools For Cutting Pole Wrap
A saw is a power tool that can be used to cut pole wrap. It is important to use a saw with a blade that is designed for cutting through plastic, such as a carbide-tipped blade.
A jigsaw can be used to cut pole wrap by following the same process as described for using a drill. First, make a hole in the wrap with a drill bit. Then, insert the jigsaw blade into the hole and use the tool to guide the blade through the wrap.
A table saw is a power tool that is used to make precise, straight cuts in wood. It consists of a table with a blade in the middle, and push the pole wrap through the blade to make the cut. Since the pole wrap is flexible be care when cutting it.
A circular saw can also be used to cut pole wrap. First, make a mark on the wrap where you want to make the cut. Then, set the depth of the blade on the saw so that it will only cut through the top layer of the wrap. Finally, align the blade with the mark and make the cut.
A utility knife can be used to cut pole wrap by following the same process as described for using a circular saw. First, make a mark on the wrap where you want to make the cut. Then, carefully run the utility knife along the line until you have cut through the entire thickness of the wrap
Cutting pole wrap may seem daunting at first, but with the right tools and techniques, you can achieve a professional-looking finish that will enhance the beauty of your home or diy project. Remember to measure precisely, use the right tools, and sand the edges to ensure a clean cut. With these tips in mind, you can confidently tackle any pole wrap DIY that comes your way.
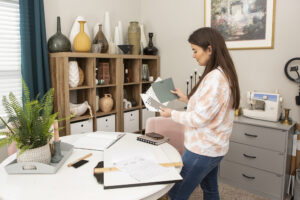
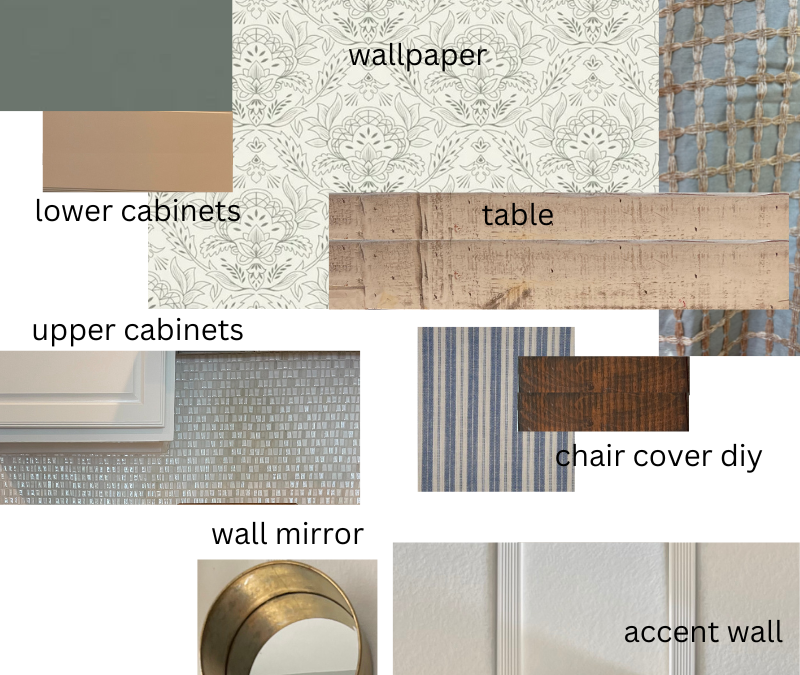
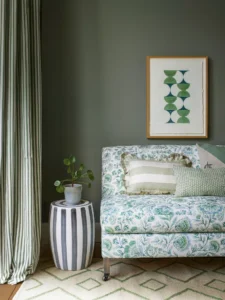
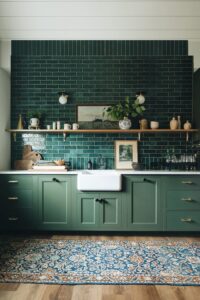
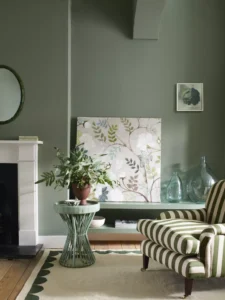
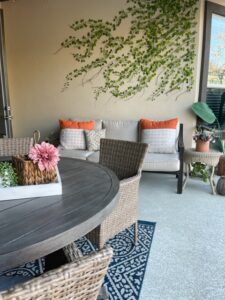
I am so excited to get back to DIY and design. I am picking up where I left off in our kitchen. I am going for a cozy kitchen vibe, with a touch of lived in lux. I want it to look a little luxurious, but just not cost it. There is hardly any luxury around here with the dogs and kiddos anyway. I will be using a similar color scheme from our living room that I love so much and go really well together, a moody blue and green! Ever since I add that blue slipcover in my living room and some frosty green accents, I have been really feeling the peace in there.
Blue and green are a great color combo and growing in popularity. I noticed it earlier this year in a bunch of spring collections and product launches. It's the perfect combo since blue and green are right next to each other on the color wheel. Two colors right next to each other are called analogous colors and typically appear to be in harmony. Blue is a calming color in general and I love that green brings a touch of nature in.
List of Dining + Kitchen Projects
skim coat and wallpaper
paint behind the kitchen cabinets
add hardware to cabinets
DIY kitchen over hood
under cabinet lighting
complete kitchen organization (for my husband who loves to cook)
dining chairs flip + back and seat covers
My goal for 2023 is to enjoy the progress of DIY and not start a new project before my last project is complete. As funny as we laugh about the 95% club, I am not ok with being in that club. It actually gives me anxiety around the house ha ha!
Some of my moody blue and green design inspiration
Faux vine walls are a beautiful and unique way to add a touch of nature to your home inside or outside. They can be used to create a variety of different looks. You can make your faux vine element lush and overgrown for a natural feel. Or create a more subtle and elegant one. I love the diamond pattern vine walls. And, best of all, they're relatively easy to create yourself and low maintenance being faux!
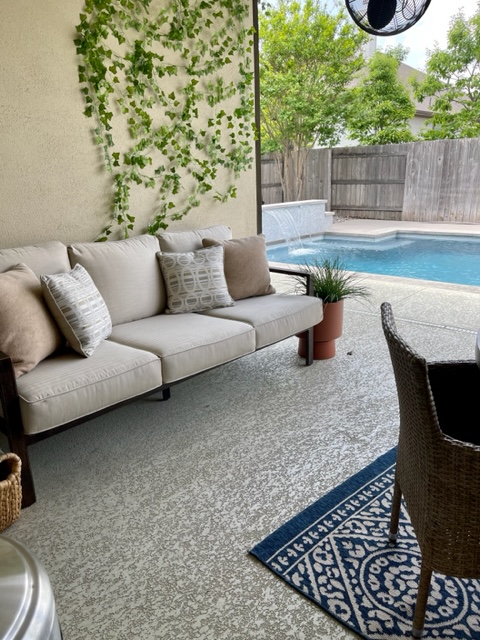
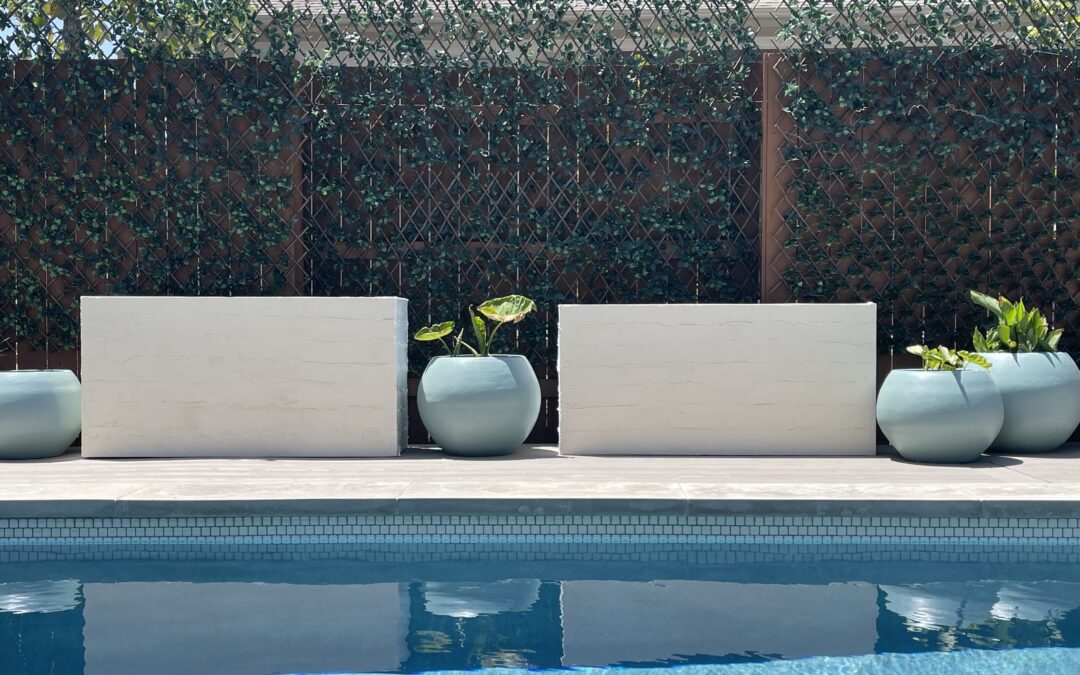
I actually fell in love with a faux vine diamond wall which started this entire project. I wanted to recreate it on my patio. A beautiful climbing vine adds visual interest to any space. We enjoy hanging out on our patio to watch movies or eat dinner. I didn't want to attract more bugs than we already get with a real vine wall.
Real climbing vines on your house don't always cause damage. It depends on what material the vine wall is climbing on and how much moisture it keeps. So, even though the risk is small for vine walls to damage your house, it was another reason to go faux!
Plus, the wall I'll be doing this faux vine wall on is behind our outdoor couch. I didn't want to have to worry about watering over the couch or it dying and being ugly, ha!
I bought these faux vine strands. I attempted to create the diamond pattern, but I wasn't loving it out here. Once I started creating an organic look, it felt perfect for this space. I probably should have started from the bottom, but our couch is against the wall. So, I started from the top and I am in love with it.
You can't beat greenery all year round, which is the main reason I am obsessed with fake vines and plants outdoors here in Texas. I love my real plants, but honestly, I have a hard time keeping them alive outside.
How to attach faux vine to a wall
I planned to use screws and fishing line to create my faux vine wall. That was a failure! Stucco is really hard to drill into, and it was taking longer than I wanted this DIY project to take. When a project is meant to be simple and it's not, I always like to step back and reevaluate it. Sometimes my expectations are just off, and sometimes there is another way.
I got a few screws in the stucco and then realized how many holes I was going to have to create. Stucco is porous and if water gets behind it, that can cause mold problems. We have a pool back here, so that was not helping me with my mold anxiety, ha ha. There are preventative measures you can take, but that and how long it was taking me I opted for another way.
I left the screws I had in and filled them with a clear caulk sealant. I decided to try gluing them. I tried a couple glues, and it didn't work. Then I thought, what about a good old fashion glue gun?
I had won a professional glue gun on Instagram recently and thought it would be perfect to try holding these faux vines up. A professional glue gun is a little more expensive than your typical glue gun. Think of it as an industrial upgrade that heats at a higher temperature and bonds better for a stronger hold than crafting calls for. I am so thankful it worked and wish I had thought of it originally, ha ha. A DIY lesson learned, and that is ok.
No one wants a faux vine wall that looks fake. To make it look as natural as possible, I added the detail it needed. It's pretty close to us and I knew it would bother me if it didn't look somewhat authentic. I used real vine branches from my aunt's house. I hot glued those on as well. The faux vines I bought look like real english ivy, and it was perfect for this big blank wall out here.
As you can see from the in-progress stage, that it might look worse before it starts to look better. Just remember to keep your inspiration picture close by, that really helped with my confidence will creating this wall. It helped me see how a real vine wall grows to try and replicate it. Unfortunately, it just takes a little while for you to see that it is looking good. I actually thought this was going to be a flop until I got towards the end of the project. It's easy to pull off with the glue if you do mess up or end up wanting to change the layout of the vines.
Steps for hanging a faux vine wall:
have a couple “real vine wall inspo” pictures to look at while creating yours
cut your faux vine in 2-3 ft strips
start the vine without the branches first, put it in different directions like your inspo picture
glue every couple of leaves, but alternating sides
I added the branches towards the end of every other section
I even cut small leaves on a few strands to make it look real
glue the faux vine strand along the branches
professional glue guns get hotter than crafting guns, so be careful
have something to set your glue gun down on, so you don't ruin a pretty pillow like I did
Weatherproofing a faux outdoor vine:
This faux vine wall cost me about $15 and is under the roof on my patio porch. With a couple coats of outdoor sealant spray you can make any faux plants outdoor ready. If you plan to use a faux vine wall where there will be a lot of sun exposure, you can splurge and buy some that are made for outdoors OR spray them first with a clear coat sealant.
Anything that is made for outdoor UV protection will work. I would use one in a spray paint can. There are a few different sealant options you can use. I would use this one that is a matte finish. If you want the leaves to have more of a gloss, than you can use this one in a gloss finish.
Additional Faux Vine Wall Tips
Here are a few tips for making your faux vine wall look its best:
Use a variety of different types of vines to create a more interesting look.
Mix and match different colors and textures to add visual interest.
Hang the vines in a staggered pattern to create a more natural look.
Use a variety of different lengths of vines to add depth and dimension.
Trim the vines as needed to keep them looking neat and tidy.
faux vine wall supplies
Options for Hanging a Faux Vine Wall
professional glue gun
command hooks
nail and fishing wire
screws and zip ties
tacks
staple gun
So, if you are looking for a way to add a touch of nature to your home? Look no further than a faux vine wall! This easy DIY project is perfect for anyone who wants to add a little bit of whimsy and charm to their space.
Inside Faux Vine Wall Ideas
Use faux vines to create a trellis or archway.
Use faux vines to frame a mirror or painting.
Use faux vines to create a headboard for your bed.
Use faux vines to add a touch of whimsy to a child's room.
For more outdoor DIY inspo here is my faux outdoor vines I used to add some greenery to our fence and a little extra privacy. A quick close-up video here
My blog is supported by readers. As an Amazon Associate, I earn from qualifying purchases. As well as other affiliated links to products I use and love. If a post is sponsored, that will be disclosed within my post. Find me on YouTube or Instagram for more DIY behind the scenes.
If you want to learn how to DIY, check out my course “Dominate DIY” where we tackle ALL the beginner basics as a community, and I teach you how to bring those magazine pages to life in your home.
Faux Vines: A Beautiful and Low-Maintenance Way to Add Lush Greenery Around The House
Faux vines are a beautiful and low-maintenance way to create a beautiful garden feel, without all the upkeep. They can be used to cover up unsightly areas, create privacy screens, or simply add more greenery to your outdoor space.
There are many different types of faux vines available, so you can choose the perfect one for your needs. Some popular options include ivy, morning glory, and wisteria. Faux vines come in a variety of colors and sizes. You can use dark green or light green or both and mix it up to find one that matches your space.
They are lightweight and easy to hang or install. They can be attached to walls, fences, or pergolas with nails, screws, zip ties, command hooks, fishing wire, hot glue etc.
Another fun way to use faux vines is to create trellis or archway. I used expandable panels to help create a little extra privacy around our pool area. Here is my how-to youtube video on that.
Once installed, faux outdoor vines require little maintenance. They do not need to be watered or fertilized, and they are resistant to pests and diseases. I spray mine off at the start of spring from dust or debris left over from winter.
You can't beat greenery all year round, which is the main reason I am obsessed with fake vines and fake plants outdoors. Don't get me wrong, I am actually a plant lover and have tons of real plants inside. I love the convenience of faux plants outside with our brutal Texas heat each summer.
When we were discussing adding a fence topper for extra height on our fence, I thought of the idea of creating a faux outdoor vine wall instead. I created a beautiful climbing faux vine wall on my patio wall the year before. I used a different kind of vine, linked here. These are strands and not on a panel. I hot glued these to my stucco and glued some real vine twigs to give it an authentic feel. I even add a few pieces each year ha ha. So, I have experience with faux vines and thought of using the panels instead of more wood on my fence.
Can faux vines be used outdoors?
Yes, faux vines and plants can be used outdoors. Keep in mind, you will want to use fake ones that are made for outdoors though. If you use faux indoor plants outside, they will fade from the sun over time. I had a couple outdoors and they faded quickly in the back yard. That is where we get the harsher afternoon and evening sun. They lasted about a year. The ones I used in the front yard took a couple years to fade as they only saw the morning sun. I even painted one of them when it started fading, because I like to experiment and paint things lol. It looked good for another 3 months and then the rest of the faux plants faded, and I tossed them out.
The faux vines panels give us a little extra privacy along the fence line from seeing eye to eye with our backdoor neighbors. We don't mind having neighbors or else we would move to the country, but we wanted a little distraction from staring right at them. Plus, the faux vine greenery was just what I needed back here for a modern touch.
Line your panels up before you screw them in to make sure they fit evenly. I wanted a certain height over the fence, so I started with my top panels and stretched them out the size of my fence section. You can have someone help hold your vine panels or use a screw to hold one side up like I did.
I drilled the screws in my fence as far as they would go WITHOUT going through the other side (my neighbor's side). Then I used the zip ties These outdoor panels are pretty light weight, but we get bursts of wind back here and I put enough screws that they were not going anywhere. I basically put them towards the ends and the middle and did another row towards the bottom.
I put the second row of faux vines on the bottom and made sure the lattice sections lined up nice and straight. If they are close together, you can't tell there are two panels. Here is a quick video for more of a visual on these faux outdoor vines. After all my panels were attached, I “fluffed” the faux vines and adjusted them a little.
I bought 6 faux vine panels for a total cost of about $250. The prices vary online for different vine options, but I bought these from Amazon. I originally bought 5 and realized I needed to double up along the fence line. So, I bought a 6th one and it was the wrong one, oops! The leaves looked so fake and horrible though. I still have that panel sitting in my garage actually! I love the leaves on the ones I ordered though. They are thick, look real and have held up so far in our Texas summers without fading.
Greenery adds a touch of luxury and elevates the overall appearance of any space. These faux vines are the focal point of my backyard and make a statement. It's an element we can enjoy all year long. I wanted these vine panels to not only be pretty to look at but be functional and add some height for extra privacy back here. We have had these over a year now and they have held up great.
My blog is supported by my readers (you) so thanks for being here. As an Amazon Associate, I earn from qualifying purchases. As well as other affiliated links to products I use and love.
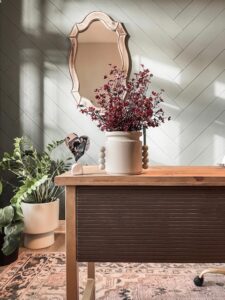
I love cute and functional. I may have taken this wood bead vase DIY a step too far with the pen holding section – but it was fun and I couldn't help myself! I found this coffee canister at the thrift store and I liked the lip detail at the top. I thought it would be cute with flowers in it. So, I decided to flip it into a vase for my office. If you have been here a bit, you already know my love for vases and all the vase DIY's I have done. What's one more!!?
This one was a little bit of a weird idea, but it was an easy DIY and derived from practicality. The vase idea came to fruition when I couldn't find a pen for work. My daughter loves to take my notebooks and pens off to her room to draw. Although I love her creative passion, it's become a bit of a problem. Seriously though, I had to start hiding them. But with my cute wood bead vase, I will always have a pen in reach. Until she figures it out, lol.
If you decide to drill holes in the beads like I did for a pen holder, you will need in addition to above a drill and twist bit a little bigger than our pen.
First, prep for your vase diy or canister if you plan on painting it. Make sure it's clean of debris and dust with a wet rag or paper towel. Give it a light sand with fine grit sandpaper. Use 320 – 400 grit. You don't want to roughen up your vase too much because then there is a chance those scratches will show through the paint. Do this before you add the wood beads so it's easier versus sanding around the wood beads.
Follow these steps if you are drilling a hole in the wood beads for a pen.
Drill holes in the beads. Make sure your holes line up, so your pen will go in straight. Use a good clamp to hold the wood beads on a piece of scrap wood. Drill a hole in the center with your twist bit all the way through the wood beads. Only drill halfway in the last bead so it holds the pen from dropping out. Use a bit big enough for a pen to go in. Measure the pen to the bit and then go up one size at least. I didn't and my pen is tighter than I want it to be in the hole.
If you just want a wood bead vase without drilling for a pen, skip the step above.
Gluing is the trickiest part of this wood bead DIY vase, but I have a few tips for you. I was being lazy at first and thought I was going to be patient enough to sit there and hold the bead to the vase until it dried, but I changed my mind after the first one. Since I drilled holes in my wood beads, I lined them all up with the pen inside and dabbed a little glue to hold them together. I used this gorilla glue pen I like the thin tip it has. Make sure you don't put too much glue, and glue the pen in. I moved the pen up and down just a little after about 15 mins to make sure it wasn't drying to the beads.
I did a similar textured vase diy with wood beads that came out really cute as well.
If you didn't drill holes, you can either glue the beads on one by one using glue and painters tape. Or you can glue them all together and then glue that piece on after it dries.
Time to paint your vase diy. I waited 24 hours to be extra safe the wood beads were secure, and the glue was dry. Then used my favorite textured spray-paint and gave it a couple of coats. I made sure to get around and under the wood beads a few times.
Spray paint tips
My motto with spray-paint is: the lighter the coat – the better! I have seen frustration on too many projects from using a heavy hand. Also, being too close to your vase will cause paint runs as well. So, I don't risk the chance of that happening anymore.
If it does happen to run, my trick is to quickly wipe it off with my finger. (kind of cringe, but it works) Just one quick stroke down and then leave it alone. Let it dry and paint a few light coats over it. Sometimes I sand it with a super fine grit sandpaper, then the light coats over it.
I am just giddy with how this wood bead vase came out. I have been seeing textured and beaded vases everywhere and I wanted to see if gluing some wood beads on would give me a similar look and I think it does.
I added some pretty faux baby's breath floral that I am kind of obsessed with at the moment. The plum goes great with my moody new desk I made over. If you missed that and love pole-wrap – you can that pole wrap diy here.
Find me on YouTube or Instagram for more DIY behind the scenes. If you want to learn how to DIY, check out my course “Dominate DIY” where we tackle ALL the beginner basics as a community, and I teach you how to bring those magazine pages to life in your home.
How cute is this summer serving tray DIY? A small material list and minimal effort, but oh so cute! I am looking forward to serving up some fresh lemonade and watermelon spritzers on this tray come summer. Since I was thinking summer tray, out by the pool, I wanted a fun design for it. I was inspired by a beautiful designer pillow I really loved but wasn't in the mood to splurge on.
This is how it turned out. This tray DIY would be cute on a coffee or side table too. Use a paint color that goes in your space and you could have a cute living room piece. The pattern is eye catching and stylish.
They have some cheap trays at Amazon and TJMaxx. I used an old tray from a thrift store, I think it was $5.99. I like to recycle home decor when I can, and this one was collecting dust in my closet. Here is a similar serving tray style to mine. It comes in a set for pretty cheap and unfinished. You could grab them and make a few tray DIY's for around the house or for gifting.
For This Easy Summer Serving Tray DIY:
I used 1.88″ frog tape, scissors, a 1″ foam brush and a small thin paint brush. I used this moody blue as it matches different spaces in my home. So, if I wanted to move it from the patio it would match my decor inside.
I used two sizes of gaps to create my design. I did this by using the full width of the tape and then cutting the tape in half for skinnier sections, you see here. If you want to be precise, you can buy two different sizes of tape. I wasn't going for perfection. Place your full width center piece tape on the tray and work outwards. I placed my full width pieces apart about 2.75″ apart to each end. I went with a diagonal layout to my square tray. I think it added a designer touch.
Cut your skinny strips. Cut several pieces of the frog tape in half. I cut them a little longer than my tray. I wanted this to be an easy tray diy, so I just eyeballed mine. Typical around here. You can measure and mark with a pencil if that works better for you. I was going for a designer artisan look anyway. Then put them in between the full pieces.
Double check your layout. Set the tray on your table and step back to get a quick look from a far and if it looks good move on to the next step. If not, readjust it.
First, paint the foam brush strokes. If you want to test it first, you can always use a piece of scrap wood or paper and do that before applying it to your tray. Less paint is best to start out, so happy painting! Make sure to leave enough space in between the foam brush dabs for the next step. Which is to apply the skinny brush strokes. Here is a quick diy tray video for a visual.
Peel your tape off once you are finished painting using both brush sets. Make sure you do this before your paint dries so it doesn't come off with the tape.
Last apply a topcoat to your tray diy so it lasts longer. Topcoats are important to protect your design from chipping or wearing over time. You don't always need one, but I highly recommend one in most instances. I used this one since my tray will be on my back porch and we use it often. So, use one according to how you will use your tray.
 Accent Wall Tips Using a Level & Square
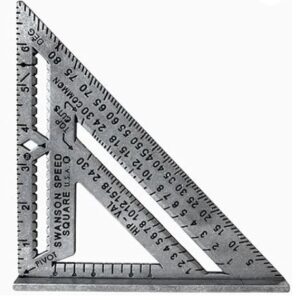
 Align one corner of the speed square with a corner of your project and verify if both sides align with the square throughout. Just as you always double-check your measurements, check your corners through out your project especially as your in progress. Depending on what project you are working on, the angles and squareness can get shifted as you build.
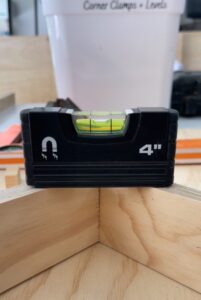
 Tips for How to Use a Level


 Safety is a top priority when learning DIY skills and doing any DIY project. Make sure to wear protective gear such as safety glasses, ear protection, masks and possibly gloves to protect yourself from harm. At first it seems trivial, but it's so important to prevent any injuries. Over time saw dust and loud noises will have an adverse effect on your body. Remember, prevention is better than cure.
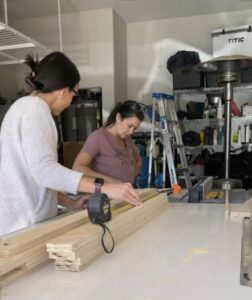 Take a Class or Course


 Faux Vine Accent Wall Material List
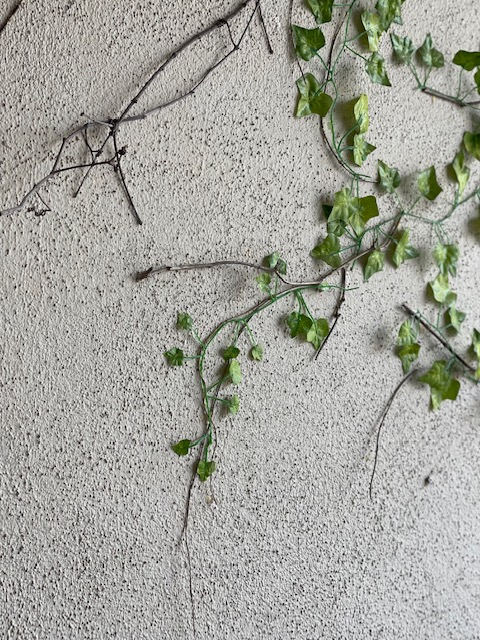 Steps for hanging a faux vine wall:
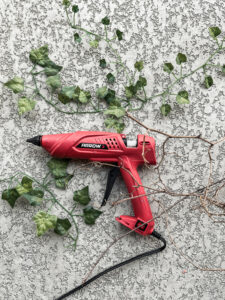
 When we were discussing adding a fence topper for extra height on our fence, I thought of the idea of creating a faux outdoor vine wall instead. I created a beautiful climbing faux vine wall on my patio wall the year before. I used a different kind of vine, linked here. These are strands and not on a panel. I hot glued these to my stucco and glued some real vine twigs to give it an authentic feel. I even add a few pieces each year ha ha. So, I have experience with faux vines and thought of using the panels instead of more wood on my fence.
  Supply List:
 I love cute and functional. I may have taken this wood bead vase DIY a step too far with the pen holding section – but it was fun and I couldn't help myself! I found this coffee canister at the thrift store and I liked the lip detail at the top. I thought it would be cute with flowers in it. So, I decided to flip it into a vase for my office. If you have been here a bit, you already know my love for vases and all the vase DIY's I have done. What's one more!!?
 Follow these steps if you are drilling a hole in the wood beads for a pen.
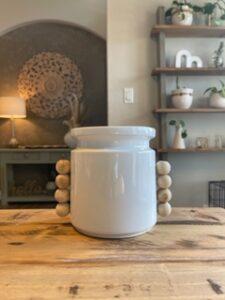 Time to paint your vase diy.
 I used two sizes of gaps to create my design. I did this by using the full width of the tape and then cutting the tape in half for skinnier sections, you see here. If you want to be precise, you can buy two different sizes of tape. I wasn't going for perfection.