
Wood Bead Vase DIY
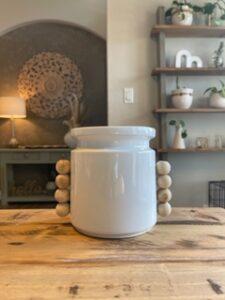
 I love cute and functional. I may have taken this wood bead vase DIY a step too far with the pen holding section – but it was fun and I couldn't help myself! I found this coffee canister at the thrift store and I liked the lip detail at the top. I thought it would be cute with flowers in it. So, I decided to flip it into a vase for my office. If you have been here a bit, you already know my love for vases and all the vase DIY's I have done. What's one more!!?
This one was a little bit of a weird idea, but it was an easy DIY and derived from practicality. The vase idea came to fruition when I couldn't find a pen for work. My daughter loves to take my notebooks and pens off to her room to draw. Although I love her creative passion, it's become a bit of a problem. Seriously though, I had to start hiding them. But with my cute wood bead vase, I will always have a pen in reach. Until she figures it out, lol.
Wood Bead Vase DIY Material List:
-
1″ wood beads
- a clamp
-
spray paint
-
glue pen or gorilla glue gun
If you decide to drill holes in the beads like I did for a pen holder, you will need in addition to above a drill and twist bit a little bigger than our pen.
First, prep for your vase diy or canister if you plan on painting it. Make sure it's clean of debris and dust with a wet rag or paper towel. Give it a light sand with fine grit sandpaper. Use 320 – 400 grit. You don't want to roughen up your vase too much because then there is a chance those scratches will show through the paint. Do this before you add the wood beads so it's easier versus sanding around the wood beads.
 Follow these steps if you are drilling a hole in the wood beads for a pen.
Drill holes in the beads. Make sure your holes line up, so your pen will go in straight. Use a good clamp to hold the wood beads on a piece of scrap wood. Drill a hole in the center with your twist bit all the way through the wood beads. Only drill halfway in the last bead so it holds the pen from dropping out. Use a bit big enough for a pen to go in. Measure the pen to the bit and then go up one size at least. I didn't and my pen is tighter than I want it to be in the hole.
If you just want a wood bead vase without drilling for a pen, skip the step above.
Gluing is the trickiest part of this wood bead DIY vase, but I have a few tips for you. I was being lazy at first and thought I was going to be patient enough to sit there and hold the bead to the vase until it dried, but I changed my mind after the first one. Since I drilled holes in my wood beads, I lined them all up with the pen inside and dabbed a little glue to hold them together. I used this gorilla glue pen I like the thin tip it has. Make sure you don't put too much glue, and glue the pen in. I moved the pen up and down just a little after about 15 mins to make sure it wasn't drying to the beads.
If you didn't drill holes, you can either glue the beads on one by one using glue and painters tape. Or you can glue them all together and then glue that piece on after it dries.
 Time to paint your vase diy. I waited 24 hours to be extra safe the wood beads were secure, and the glue was dry. Then used my favorite textured spray-paint and gave it a couple of coats. I made sure to get around and under the wood beads a few times.
Spray paint tips
My motto with spray-paint is: the lighter the coat – the better! I have seen frustration on too many projects from using a heavy hand. Also, being too close to your vase will cause paint runs as well. So, I don't risk the chance of that happening anymore.
If it does happen to run, my trick is to quickly wipe it off with my finger. (kind of cringe, but it works) Just one quick stroke down and then leave it alone. Let it dry and paint a few light coats over it. Sometimes I sand it with a super fine grit sandpaper, then the light coats over it.
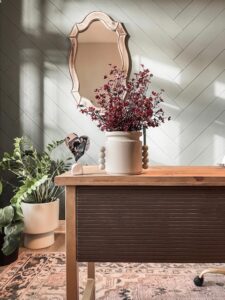
I am just giddy with how this wood bead vase came out. I have been seeing textured and beaded vases everywhere and I wanted to see if gluing some wood beads on would give me a similar look and I think it does.
I added some pretty faux baby's breath floral that I am kind of obsessed with at the moment. The plum goes great with my moody new desk I made over. If you missed that and love pole-wrap – you can that pole wrap diy here.
Find me on YouTube or Instagram for more DIY behind the scenes. If you want to learn how to DIY, check out my course “Dominate DIY” where we tackle ALL the beginner basics as a community, and I teach you how to bring those magazine pages to life in your home.