The Level & Square | DIY Woodworking Beginner How-to & Fundamentals
Two hand tools as a Woodworking beginning & for DIY home projects you will need is a speed square and a bubble level.
You know the saying “don't be a square” – aka not cool or just not nice? It's quite the opposite when it comes to Wood Working and DIY. You actually want to be square – well you want your DIY & Woodworking projects to square.
Projects being square is one of the most important lesson (besides safety) that I've learned when it comes to building furniture, woodworking and DIY home projects.
Always ensure your projects are level, plumb & square from the very beginning. In this blog post I'll talk about those terms mean, the different types of squares and levels and what they are used for.
I'll also go over step by step instructions on how to use them. And provide tips for getting your wood working and DIY projects aligned from the beginning to eliminate mistakes. Let's start with what being square means.
The Terms & Definitions for Woodworking & DIY Beginners:
- Level: When an object or surface is level, it means it is perfectly horizontal or parallel to the earth's surface, like a ball sitting on top won't roll, ha! In woodworking, ensuring surfaces like shelves, tabletops, or countertops are level is essential for functionality and aesthetics. A level surface ensures that objects placed on it will not tilt or roll and provides a visually pleasing result.
- Plumb: Plumb refers to an object or surface that is perfectly vertical or perpendicular to the earth's surface. In woodworking, ensuring that structures like walls, posts, or cabinets are plumb is crucial for stability and structural integrity. This ensures that the weight is distributed evenly and prevents leaning or tilting, especially in load-bearing elements.
- Square: Squareness in woodworking refers to the angle formed between two intersecting surfaces, typically 90 degrees. Ensuring that corners, joints, and edges are square is essential for proper fitting, alignment, and stability of the overall structure. This ensures that pieces fit together accurately and results in a professional-looking finish.
In summary and an easy way to remember: horizontal (level) or vertical (plumb) level, plumb, and square are fundamental concepts in woodworking and DIY projects that basically means the surfaces are flat, vertical, and properly aligned.
First, let's dive into why this step is SO crucial for success.
(As an Amazon Associate I earn from qualifying purchases at not additional cost on your end)
Reasons Why Getting DIY Projects Square is Key:
- Stability: Square and plumb structures are more stable, ensuring longevity and safety.
- Functionality: Properly squared furniture pieces fit together seamlessly, enhancing usability.
- Ease of Assembly: Square components make assembly straightforward and reduce frustration and ensures pieces are more compatible and easier to integrate with other furniture or structures.
- Precise Measurements: Ensuring squareness helps maintain accurate measurements throughout the project and can help you catch mistakes during wood working & DIY projects
- Alignment: Square components align correctly, preventing misalignment issues down the line.
- Mitigating Warping: Square projects also helps minimize the risk of warping or twisting over time.
- Aesthetics & Professional Finish: Squareness lays the foundation for flawless finishes, adding to the overall appeal. Square edges and corners result in a polished, professional appearance for your projects.
Achieving squareness from the very beginning is key to a successful project completion.
Furniture Building Tips Using a Level & Square
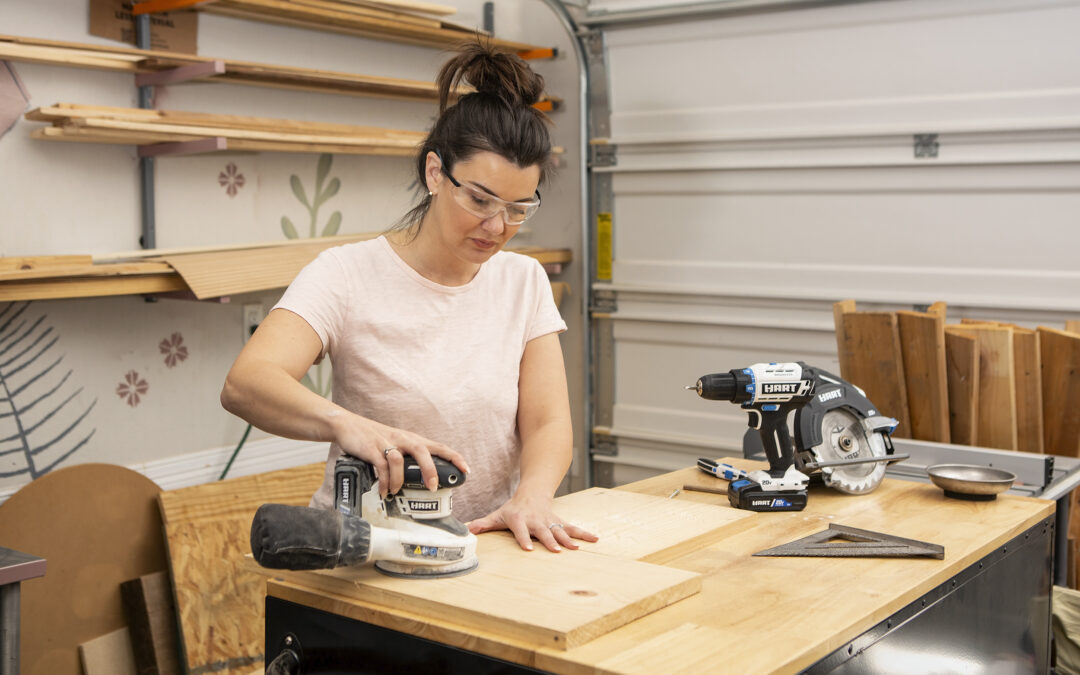
When it comes to furniture building, making sure your pieces of wood are square and level is crucial for a sturdy and visually appealing final product.
One tip is to always double-check your measurements and use a reliable square tool to ensure precise angles. Additionally, when attaching legs to a table or any other structure, make sure they are perfectly square unless the design calls for a specific angle. You don't want your table to wobble! Trust me, I've had to fix this once and it wasn't fun having to redo the work I just completed.
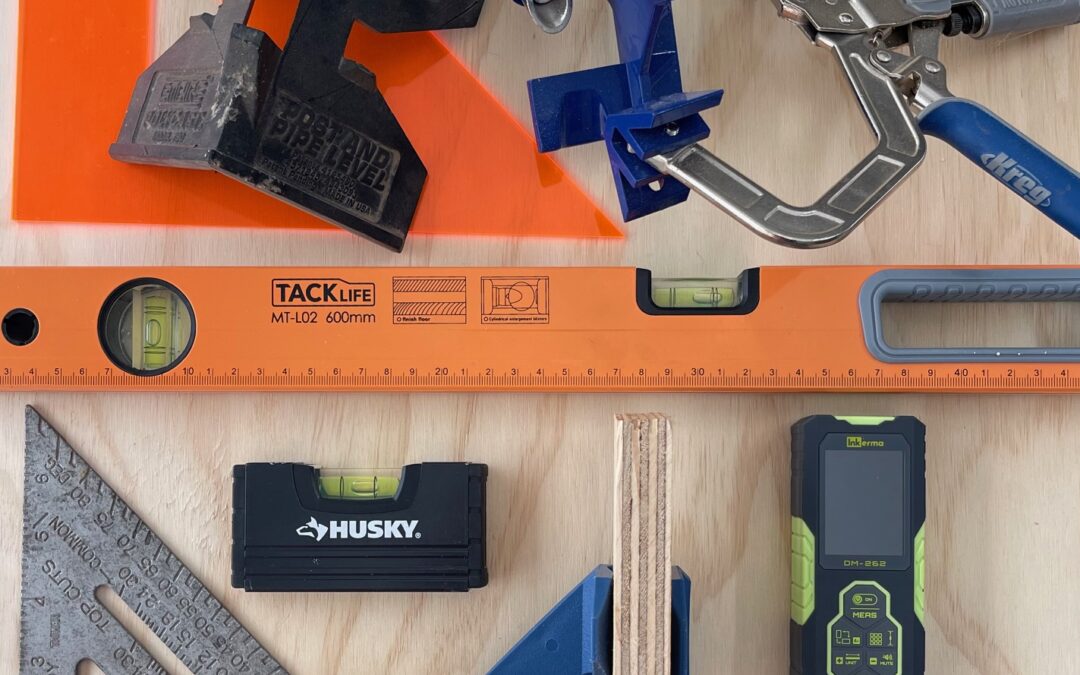
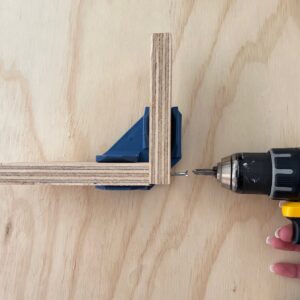
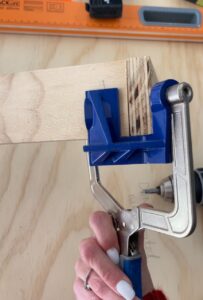
Utilizing clamps during assembly can also help keep pieces aligned while glue dries and maintain squareness throughout the build. They make different types of corner clamps and framing square jigs that you can buy to help assist while getting your corners squared up.
If something isn't perfectly square, make adjustments before the glue sets. Often, simply readjusting the position of a board, loosening a screw or clamping the boards can square them up.
Investing in quality leveling tools, such as a bubble level or a laser level, can greatly assist in ensuring all components are perfectly level, resulting in a professional finish. By following these tips and utilizing the right tools, you can create furniture pieces that are not only visually appealing but also built to last.
 Accent Wall Tips Using a Level & Square
Creating a stunning accent wall begins with ensuring it's square and level from the get-go. Of course there are plenty of designs like the herringbone wall and geometric designs where your guidelines might look a little different.
But for accent walls like board and batten and shiplap, start by marking level lines on the wall using a carpenter's level or laser level. These lines serve as a guide for the placement of your wood trim or shiplap. When installing the trim or shiplap, it's essential to use a stud finder to locate and mark the studs in the wall.
Heavier woods should be anchored into studs, but there is a “criss cross” method or hack using the brad nail gun for drywall attachment only.
This ensures your pieces have a solid anchor for support. Additionally, using the ceiling and floor as reference points can help maintain straightness and centering. However, always double-check with your level to ensure accuracy. When installing each piece, use finishing nails or a brad nailer to secure them in place, ensuring they're flush with the level lines for a seamless finish. By following these tips and utilizing the proper tools, you can achieve a perfectly square and level accent wall that adds depth and character to your space
Before making your cuts, it's recommended to trim approximately 1/4-1/2” off your board. Typically, the ends of boards purchased from stores aren't perfectly square. Trimming off a bit ensures they're squared up for accurate cuts.
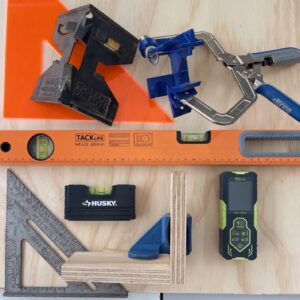
Here are a few different types of squares:
- Speed Square: A versatile tool used for marking angles and making square cuts, particularly in carpentry and roofing. It features a triangular shape with various markings for different angle measurements. The speed square what I use the most in my woodworking and DIY projects. It's affordable and efficient.
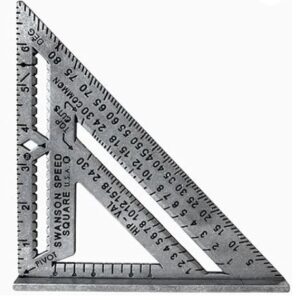
(this is the one I bought) amazon affiliate link
- Framing Square: Also known as a carpenter's square, it's primarily used in framing carpentry for laying out and cutting rafters, stairs, and framing joints. It consists of two arms, one long and one short, typically at a 90-degree angle. I have one my dad gave me and I've used it a few times during bigger DIY home projects
- Miter Square: Specifically designed for marking and cutting precise miter joints at various angles, commonly used in woodworking for trim and molding work.
- Combination Square: This tool combines a ruler and square head, allowing for precise measurements and marking of 90-degree and 45-degree angles. It's commonly used in woodworking and metalworking.
- Try Square: A simple square with a stock and blade at a 90-degree angle, used for checking and marking right angles in woodworking and carpentry.
- Adjustable Square: Similar to a try square but with an adjustable blade, allowing for flexibility in marking and checking angles other than 90 degrees.
- Engineer's Square: A precision square with a hardened steel blade and stock, used for checking the accuracy of machinery and metalworking projects
- Rafter Square: Similar to a framing square but with additional markings and measurements specifically for laying out rafters and roof pitches, commonly used in carpentry and roofing.
Tips for How to Use a Square:
 Align one corner of the speed square with a corner of your project and verify if both sides align with the square throughout. Just as you always double-check your measurements, check your corners through out your project especially as your in progress. Depending on what project you are working on, the angles and squareness can get shifted as you build.
Another way to double check, is to use a tape measure to measure from one opposite corner to another, repeating the process for all corners. Consistent measurements indicate a square project.
Each type of hand tool square serves specific purposes in various trades and projects, ensuring accuracy and efficiency in layout and construction tasks. I suggest starting with the most common speed square for beginner wood working and DIY projects.
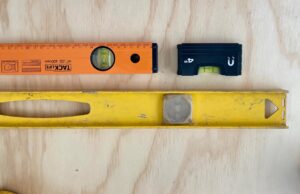
Here are a few different types of levels:
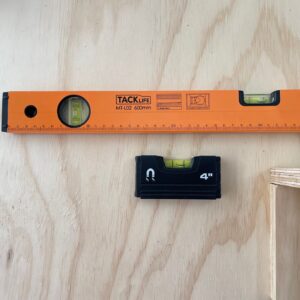
- Bubble Level: Also known as a spirit level, it's a basic level with a bubble vial filled with liquid and an air bubble. It's used for determining if a surface is horizontally or vertically level by centering the bubble between two reference lines.
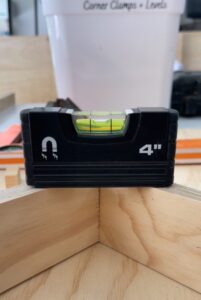
- Torpedo Level: A smaller, compact level with a torpedo-shaped body, often with magnetic edges for attaching to metal surfaces. It's useful for tight spaces, such as plumbing work, and for checking horizontal and vertical alignment.
- Box Level: Featuring a rectangular body with multiple vials for checking horizontal, vertical, and sometimes diagonal levels simultaneously. It's commonly used in carpentry, construction, and general household tasks for ensuring accuracy in larger projects.
- Digital Level: Utilizes electronic sensors to provide precise digital readings of angles and levels. It often includes features such as a backlight display and audible signals for accuracy. It's beneficial for highly accurate measurements in professional settings like engineering and surveying.
- Line Level: A small, lightweight level with hooks or notches for attaching to a string or line. It's primarily used in construction and landscaping for ensuring straight and level lines over long distances, such as when installing fences or decks.
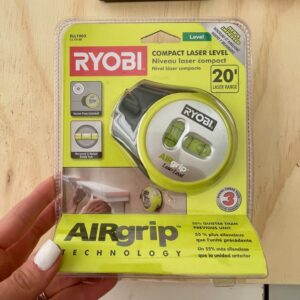
- Laser Level: Projects a visible laser beam onto surfaces to provide precise horizontal, vertical, or angular reference lines. It's ideal for large-scale construction projects, such as setting foundations or installing tiles, where accuracy over long distances is critical.
Each type of level serves specific purposes in different trades and projects, ensuring precise alignment and accuracy in various applications.
 Tips for How to Use a Level
I can't think of a project I haven't used a level and some type of square on, minus crafting and DIY home decor. Here's a quick instruction guide for using a bubble level.
Begin by placing the level on the surface you want to check. Adjust the position until the bubble in the tube is centered between the lines.
For horizontal leveling, move the level along the surface until the bubble is centered. Try your best to get the bubble in the very center, and just use your best judgement and don't be overwhelmed with perfection. The two lines are there as a guide, so your best guess between those will do.
To check vertical surfaces, align the level vertically and adjust until the bubble is centered. Again use your best judgement to get it as centered as possible.
When using a bubble level, make sure it's in good condition and free from dirt or damage that could affect its accuracy. I have one that my dad gave me that started not to work.
Additionally, always check the level against multiple points to ensure consistency and accuracy throughout your project

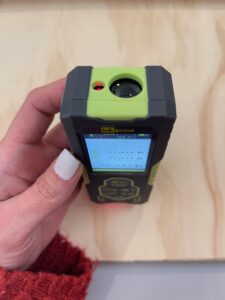
How to Use a Laser Level
Generic steps on how to use a laser level to ensure accurate and precise measurements:
- Setup: Start by placing the Inkerma laser level (the one I own) or any level of choice on a stable surface or mounting it securely to a tripod. Ensure that the level is positioned at the desired height and location for your project.
- Power On: Turn on the laser level by pressing the power button or switch. Some models may require you to hold the button for a few seconds to activate.
- Select Unit and Mode: Depending on your project requirements, select the appropriate unit measurement (I use inches) and the mode on the laser level. Common modes include horizontal, vertical, cross-line, or rotary modes. Adjust the settings according to your specific needs.
- Adjustment: Use the built-in adjustment knobs or buttons to fine-tune the laser level's position and alignment. Ensure that the laser lines are perfectly level or plumb according to your project's requirements.
- Placement: Position the laser level at the starting point of your project. Ensure that it is stable and securely placed to prevent any movement during operation.
- Alignment: Once the laser level is positioned correctly, activate the laser beam(s). Check the alignment of the laser lines against your reference points, such as walls, floors, or other surfaces. Make any necessary adjustments to ensure accurate alignment.
- Marking: Use a pencil or marker to mark the projected laser lines on the surfaces you are working on. These marks will serve as guides for your construction or installation tasks.
- Operation: Proceed with your construction or installation tasks, following the marked laser lines as guides for precise alignment and positioning.
- Monitoring: Throughout your project, periodically check the alignment of the laser lines to ensure that they remain accurate and consistent. Make any adjustments as needed to maintain alignment and precision.
- Power Off: Once you have completed your project or no longer require the laser level, turn it off to conserve battery power. Store the laser level in a safe and dry place for future use.
Some common modes and options found in laser levels include:
- Horizontal Mode: Projects a horizontal laser line across a surface, typically used for aligning objects or installing fixtures such as shelves or cabinets.
- Vertical Mode: Projects a vertical laser line, useful for tasks like aligning tiles, installing wall-mounted objects, or ensuring upright positioning of structures.
- Cross-Line Mode: Simultaneously projects horizontal and vertical lines, creating a crosshair pattern. This mode is beneficial for tasks requiring both horizontal and vertical alignment, such as installing drop ceilings or partition walls.
- Manual Mode: Allows manual adjustment of the laser beam's direction and angle, useful for custom alignments or non-standard applications.
- Rotary Mode: Projects a rotating laser beam in a 360-degree horizontal or vertical plane. Rotary laser levels are ideal for large-scale projects such as outdoor grading, landscaping, or laying foundations.
- Pulse Mode: Enables the laser level to emit pulses of light instead of continuous lines, enhancing visibility in bright light conditions or over longer distances. Pulse mode is often used with a receiver for outdoor applications or when working in challenging environments.
- Self-Leveling Mode: Automatically levels the laser beam within a specified range, compensating for minor surface irregularities or vibrations. This mode ensures accuracy and consistency in leveling and alignment tasks.
- Manual Leveling: Some laser levels offer manual leveling capabilities, allowing users to adjust the level manually using built-in controls or adjustment knobs. Manual leveling may be preferred for specific applications or when working on surfaces that are difficult to level automatically.
- Dual Slope Mode: Found in advanced rotary laser levels, dual slope mode enables the laser beam to project at two different slopes simultaneously, useful for tasks like grading or laying drainage systems.
- Remote Control: Some laser levels come with remote control capabilities, allowing users to operate the level and adjust settings remotely, enhancing convenience and efficiency, especially when working alone or in hard-to-reach areas.
These modes and options provide users with flexibility and versatility in laser level operation, catering to a wide range of construction, woodworking, and DIY projects.
I hope you learned a bit more about how important it is to get your woodworking and DIY projects level and square from the very beginning. It's a crucial aspects of ensuring accuracy and precision in constructing projects and furniture assembly.
If you have any additional questions or tips I should add leave a comment or find me over on Instagram.

 Safety is a top priority when learning DIY skills and doing any DIY project. Make sure to wear protective gear such as safety glasses, ear protection, masks and possibly gloves to protect yourself from harm. At first it seems trivial, but it's so important to prevent any injuries. Over time saw dust and loud noises will have an adverse effect on your body. Remember, prevention is better than cure.
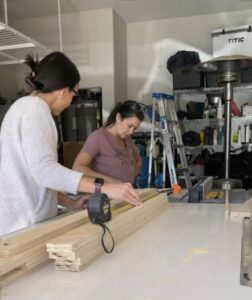 Take a Class or Course