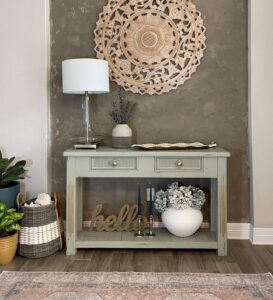
If you are looking for a stylish and sophisticated accent wall, a concrete faux accent wall is a great design option. Its raw beauty brings such a unique feel to any space, and it goes with every interior design style. The faux concrete accent wall I did in my house created a beautiful backdrop for my entryway. Walking into that texture just never gets old. This is an inexpensive accent wall that will make a statement. It is cheaper than wood and wallpaper coming in at under $50, depending on how big your wall is.
I will take you through the exact process below that I used and show you step by step instructions. Plus, a couple things I did, that I would do differently!
Faux Concrete Accent Wall Material List:
- Ardex Feather Finish – Cement Repair Mix
- Mixing Bucket
- Power Drill and Mixing Paddle
- Or a large hand mixer for small to medium wall (what I used)
- Floor Protector (or a couple of old towels)
- Painters Tape
- Large Drywall Tapping Knife (I prefer the plastic ones)
- Mudpan (or save your plastic butter tub)a Mask (mixing is a little dusty)
Although I love the problem-solving aspect of DIY projects, I also love when my projects go as smooth as possible. So, my first tip is to mix a small batch of the Ardex mix and practice on a piece of scrap wood or cardboard box. This will give you the feel for using the product in general and in my opinion, make your faux concrete accent wall that much easier.
Prep
Prep your floor area and get everything ready. The concrete mix dries quickly, and it can be a bit messy. Lay down a floor paint protector or a few towels. I have tile so I used an old sheet folded in half and had no problems. Tape it down and tape off your baseboards.
Tape off your wall. Use painters' tape to line the outside of the wall just as you would if you are painting. Add another layer of tape or paint protection paper to cover more wall area. That is one thing I did not do, and the faux concrete got on the adjacent wall. You can easily wipe it off before it dries, and paint over the stain it leaves.
Mixing
Mix Your Ardex Concrete (don't miss important note below). Decide how much you will need for your wall and mix it with water. To figure this out, use the instructions on the box for the square footage and mixing ratio. The box says to mix 2 parts cement powder to 1 part water ratio. I like to use my handy red solo cup to measure this out. Don't be alarmed at how dark it is when it's mixed, it dries much lighter. This is a little dusty, so I like to wear a mask.
After I mix it, I typically add a couple extra splashes of water. I have used this product in a variety of applications, and I find it easier to spread, especially on the wall, when it is a little thinner than what the directions call.
Keep in mind, everything you use should be disposable or plan to rinse off as soon as you are finished. The faux concrete dries quickly and will ruin whatever it dries on. With this in mind also plan on doing this project all at once, you can't cover the product and come back to it an hour later.
To clean up: I wipe everything off with a paper towel to get most of the concrete off the tools and knife. Then, I rinse everything outside or in my sink if there is not a lot of residue left to go down the drain. Sometimes I will rinse it in a bowl and then pour the bowl in the trash.
Important Note. If you mix one batch of concrete and apply it to part of your wall. Then mix another batch and apply it to the rest of your wall. The colors could be slightly different gray variations. Some people like that look, if you do, have a plan on where you want each batch to go on the wall. If not, and you want a smoother look that is one color, mix what you need (or more) in one batch.
